
It’s incredible how often we see failing paint in homes, specifically peeling paint. Ceilings, walls, exterior, cabinets, doors…we’ve seen it all. What’s even crazier is that the peeling is often the result of another “professional” painter’s work. We see failed paint when shortcuts are made and surfaces aren’t properly prepped. This goes for both interior and exterior surfaces.
If you are seeing peeling paint in your home, it’s important to understand why it’s happening, how to fix it, and how to prevent it from happening again! Of course, the simplest solution is to get in touch with us – we’ll come out, inspect the issue, tell you why it happened, and provide a no-obligation quote to get it fixed.
Let’s go through some of the common issues that we see with failing paint, why they happen, and what to do.
Why Paint Won't Stick/Adhere
These are the typical reasons why your paint may not be adhering the way that it should.
Culprit 1: Glossy Substrate
The surface is glossy from old, aged, oil-based paint. This substrate should have been sanded and cleaned to create “tooth.” Essentially, we need to create a mechanical abrasion that will rough up that glossy surface and give the next paint something to grab onto.
Here’s an example of a door that was painted over a glossy surface.
The paint on this door is one of the best: Benjamin Moore Advance, proving that even the best paint requires proper prep before applying.
One way to tackle a project like this is to sand with 220 grit sandpaper, clean with denatured alcohol to remove grease then apply a coat of Zinsser Oil Cover Stain bonding primer to ensure maximum adhesion and bond. This will create sound a sound substrate for your finish coats and prevent peeling.
Unfortunately the last painter did not follow any of these steps and we had to remove it all and repaint – what a mess and a costly mistake!
Culprit 2: Paint Applied Too Thick
If the paint, no matter how high quality it is, is applied in too thick of a layer, it will not dry correctly. And thus it will not adhere correctly and will end up peeling or cracking. Learn more about the appropriate thickness that paint should be applied.
Culprit 3: Surface Contaminants
The substrate has hand oils, cooking oils, food, or some other type of contaminate such as hairspray – those are surface contaminants that can lead to peeling if the paint is applied on top of it. Even cleaners with any wax or oil in them (such as wood cleaners) will prevent proper adhesion. That’s why it is so important to properly clean the surface before anything else.
We recently did a job where we saw this exact issue. The trim was newly installed, pre-primed, and painted with a really nice trim paint – Sherwin Williams Emerald Urethane. When we arrived to paint the walls and ceilings, we meticulously taped off the trim with blue safe-release painters tape. Once the work was completed and we started to remove the tape, the paint underneath peeled off right along with the tape.
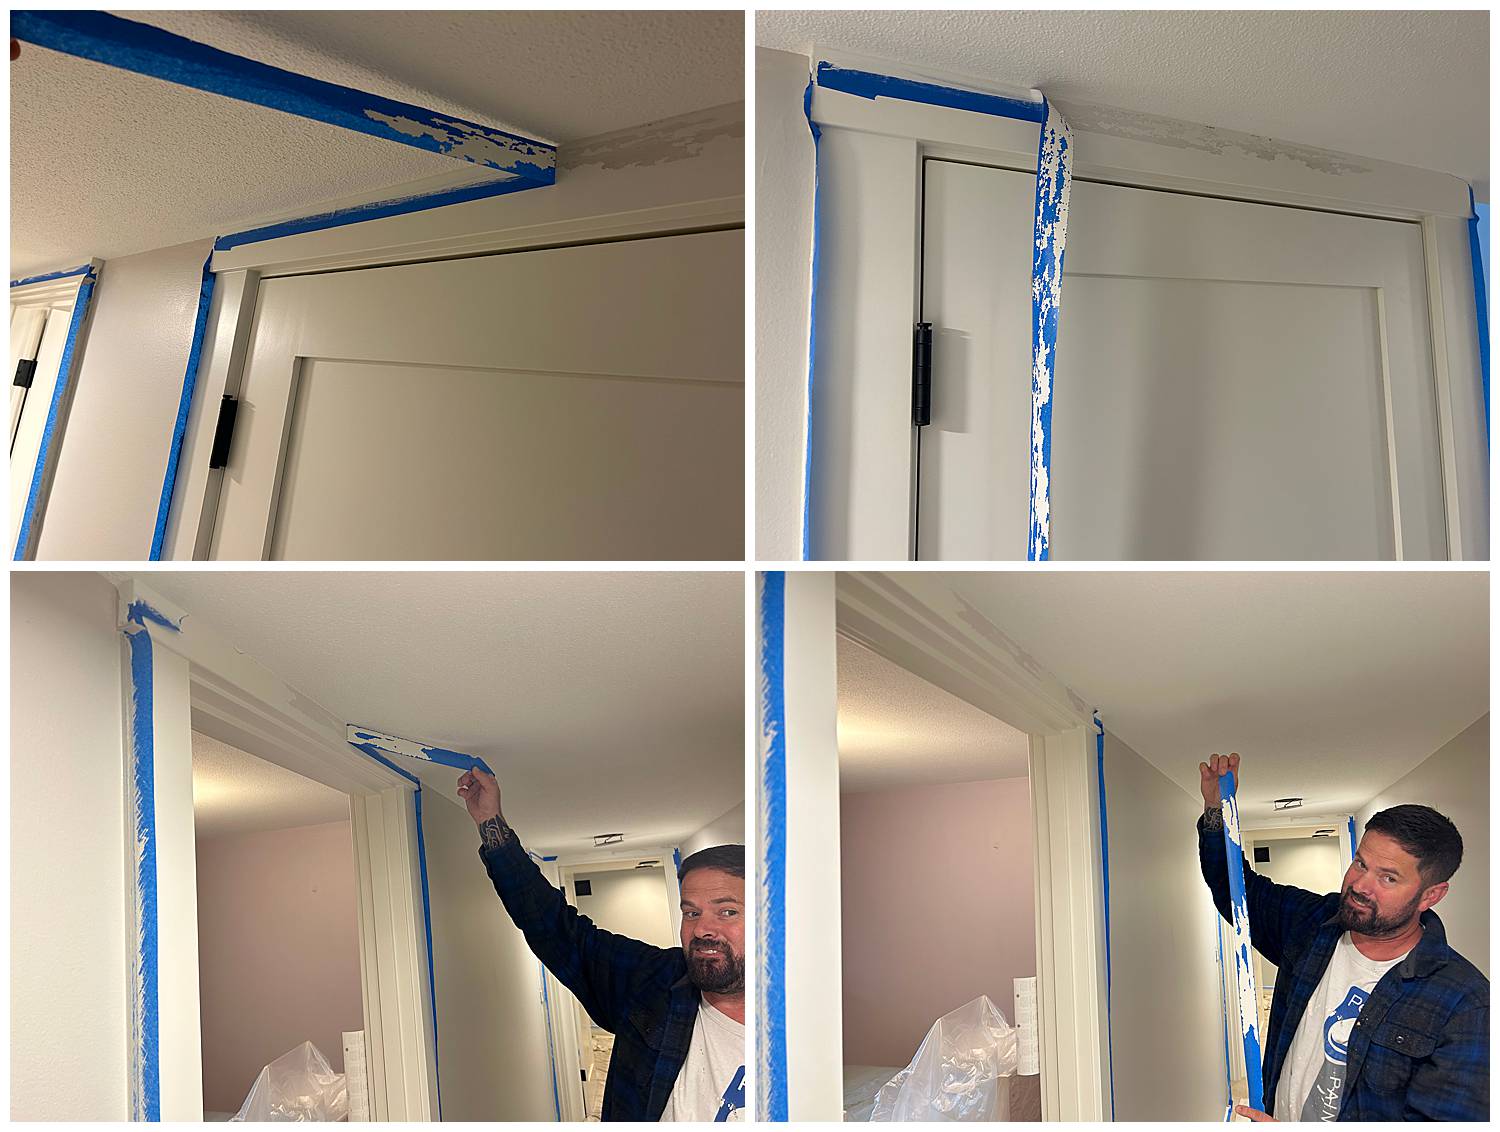
So what happened? Turns out the painter they hired was chosen due to lower cost, but this so-called professional painter didn’t even bother to clean the trim. They painted right over the dusty surface, so the trim paint didn’t adhere at all.
The right solution at this point was to remove all the failing paint, properly clean, and repaint. Unfortunately this also required a complete re-edging of the wall and ceiling color. This was a major setback and headache for the homeowner that added a significant amount of time, frustration and cost to the project. This nightmare could have been avoided had the initial painter had a proven process to follow.
Culprit 4: The First Coat Didn't Dry Properly
Just because you can touch the paint and it feels dry does not mean it’s actually dry or ready to be repainted. Every paint line has a data sheet that specifies re-coat times and mil thickness. Some paints even have a re-coat window, meaning that if you wait too long to put your 2nd coat on that the paint will not stick to itself without sanding and cleaning. Check this data and follow it before painting and you’ll have a perfectly adhered second coat of paint.
Culprit 5: Over-Thinning
If you thin your paint too much, particularly when using a paint sprayer, this will compromise longterm hardness of the paint coat. We often see painters and DIYers use sprayers that are not meant for applying thick coatings like trim and cabinet paint. It’s important to use a sprayer that’s meant for thick coating, as weak sprayers are unable atomize the paint properly to get a smooth finish. So when someone is using this type of sprayer, they compensate by adding in water or paint thinner. And that leads to poor adhesion.
Bottom line: Thin your paint properly and if using a paint sprayer, make sure it’s the right kind for your project.
Culprit 6: Too Much Colorant
Dark colors that have a lot of colorant added will also compromise coating hardness and can lead to peeling. Pros who are in the know will request that the paint store use high performance colorant like 896 hot tint. This special high-performance pigment is concentrated, and actually uses less colorant, thus you end up with a harder coating. (If you’re a baker, think of it like liquid vs paste food coloring.)
For extra durability on cabinets and high-traffic surfaces like handrails, use a clear protective finish as a final layer. This gives the paint an extra sacrificial layer of protection. This should go without saying, but always test for compatibility between the clear coat and the paint.
Culprit 7: Initial Substrate Not Adhering
Sometimes the starting layer of your substrate is already not adhering. It’s best practice to ensure that the current paint you are getting ready to paint over is tightly intact before you start. Simply priming or painting over a coating that is not already tightly adhered will not magically make those lower layers stick. In fact, it’ll make things worse.
For example, on exterior surfaces, the extra weight and surface tension that is created with another layer can actually cause bubbling to occur, even if you didn’t observe peeling paint before you started. Exterior surfaces are particularly affected by this due to dramatic temperature swings outside.
Put it All Together - Prep Properly!
This is what we recommend as best practice to avoid failing, peeling paint.
- Step 1: Confirm that the old paint is tightly adhered.
- Step 2: Sand to create a mechanical bond or give the surface tooth
- Step 3: Clean to remove any possible contamination and sanding dust.
- Step 4: Create a chemical bond with an oil-based primer.
- Step 5: Properly apply your paint and finish coats.
Following these steps is the equivalent of wearing a belt and suspenders at the same time – a proven system that will not fail!
At Pearl Painters, we have our Best Known Methods that we have developed over 20+ years of professional painting to ensure that your paint does not peel due to paint failure.
Our Disclaimer
Like we said at the beginning, we unfortunately see paint failure and peeling paint all the time. It genuinely is so common that we added a disclaimer to our contracts! Here it is:
Poor Inter – Coat Adhesion: Pearl Painters will use industry standard painters tape and cannot be held liable if current substrate or adjacent substrate lifts due to poor inter-coat adhesion from previous paint jobs. This also includes adjacent surfaces that we have to mask off in order to prevent drips or paint hits such as floors.
Get it done right the first time
