
At Pearl Painters, we believe that great prep work is what makes a great paint job. That’s especially true when it comes to painting the exterior of your home. While color gets all the attention, what really matters for long-lasting results is what happens before a single brushstroke hits the siding. That includes cleaning, sanding, and critically: caulking and repairs.
In this post, we’re diving into what we do to properly seal and repair your home before exterior painting. Whether we’re working on an older home in Portland with cedar siding or a newer build with HardiePlank, these steps are essential for durability and a finish that stands the test of time (and Pacific Northwest weather).
Caulking & Sealing Gaps
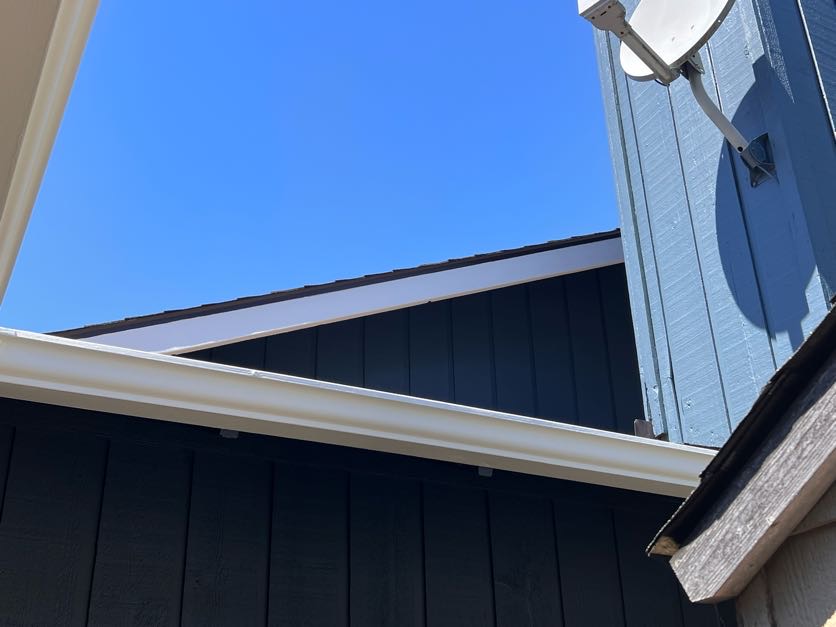
One of the most important parts of exterior prep is sealing gaps and cracks with high-quality caulk. Why? Because moisture is the enemy of paint and of your home’s health. Gaps around windows, trim, and siding joints allow water to sneak in, leading to peeling paint, mold, rot, and damage behind the scenes.
We meticulously inspect your home’s exterior for any openings that need to be sealed. Our team uses a combination of visual inspection and feel to identify trouble spots, even those that might look minor can create problems down the road.
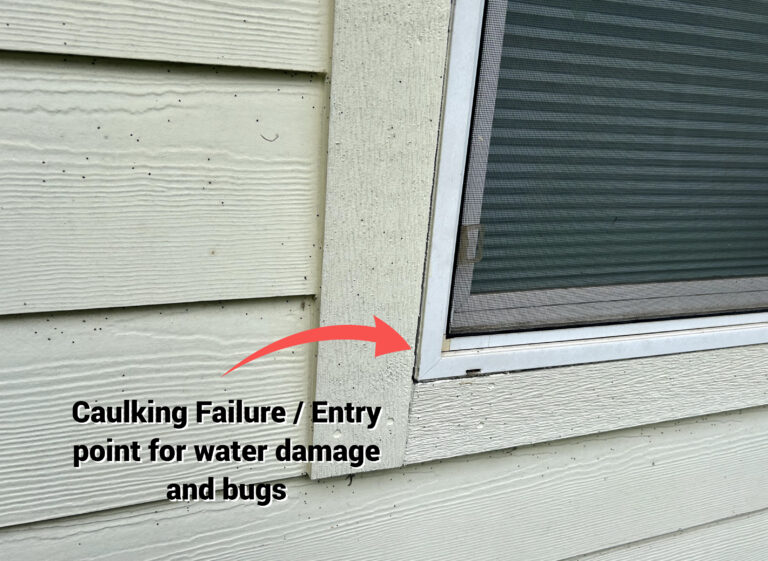
Where & Why We Caulk
So where exactly do we apply caulk before painting your home’s exterior? Here’s a look at the most common areas:
We never caulk areas that are meant to breathe or expand, such as siding butt joints on HardiePlank (when metal flashing is present). Caulking the wrong areas can actually cause damage by trapping moisture instead of letting it escape. This is where experience really matters, and why we always follow manufacturer specs and building science best practices.
Window and door trim – To seal the joints where trim meets siding or frames
Siding seams and joints – Especially with wood siding, where boards meet or overlap
Nail holes and small gaps – To smooth out blemishes before paint goes on
Where trim meets masonry – Like brick or concrete foundations
What Caulk Do We Use?
Not all caulk is created equal, and we don’t settle for anything but the best. We have on go-to product: Tower Tech²™ Caulk. This has been our go to caulking for more than 15 years. It delivers pro-grade performance with 800% elongation and superior adhesion, making it ideal for dynamic joints up to 2” wide. It’s backed by a lifetime warranty, Tower Tech²™ is UV and mildew resistant, VOC compliant in all 50 states, and exceeds major ASTM and Federal specs for flexibility, durability, and safety—perfect for both interior and exterior applications. Click here to learn more about Tower Tech 2 Caulking.
We love that this caulk is paintable, adheres well to a wide variety of surfaces, and can stand up to the freeze-thaw cycles we see here in the Portland area.
We apply caulk with precision and smooth it out cleanly – not gooped on, not smeared around. We want your caulk lines to disappear under paint, not draw attention to themselves.
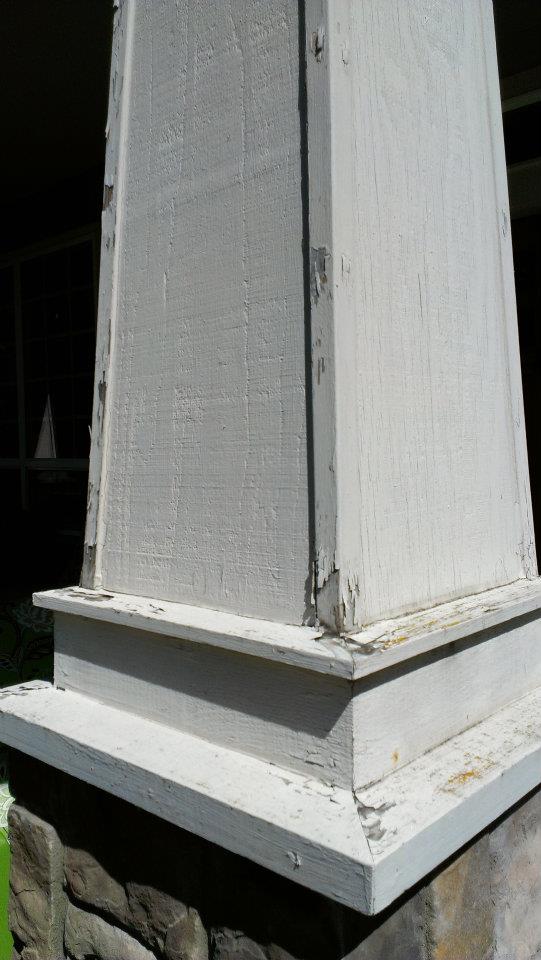

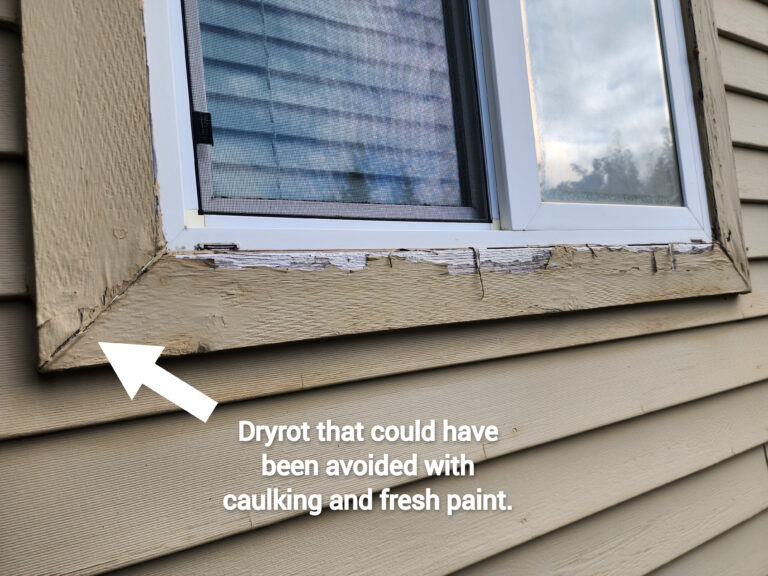
Repairing Wood & Fixing Problem Areas
Surface repair is another critical part of the prep process. If your trim or siding has seen better days, we take the time to patch, sand, and repair the surface so that the paint not only adheres properly but looks amazing.
Common repairs include:
Filling holes or dents in siding and trim with exterior-grade wood filler or epoxy
Sanding rough patches for a smooth finish that won’t telegraph through the paint
Fixing cracks that are too big for caulk with the right fillers and backers
Tightening loose trim or securing boards that have shifted over time
These steps might seem small, but they make a big difference. A surface that’s been properly repaired before painting will hold paint better and look newer, longer.
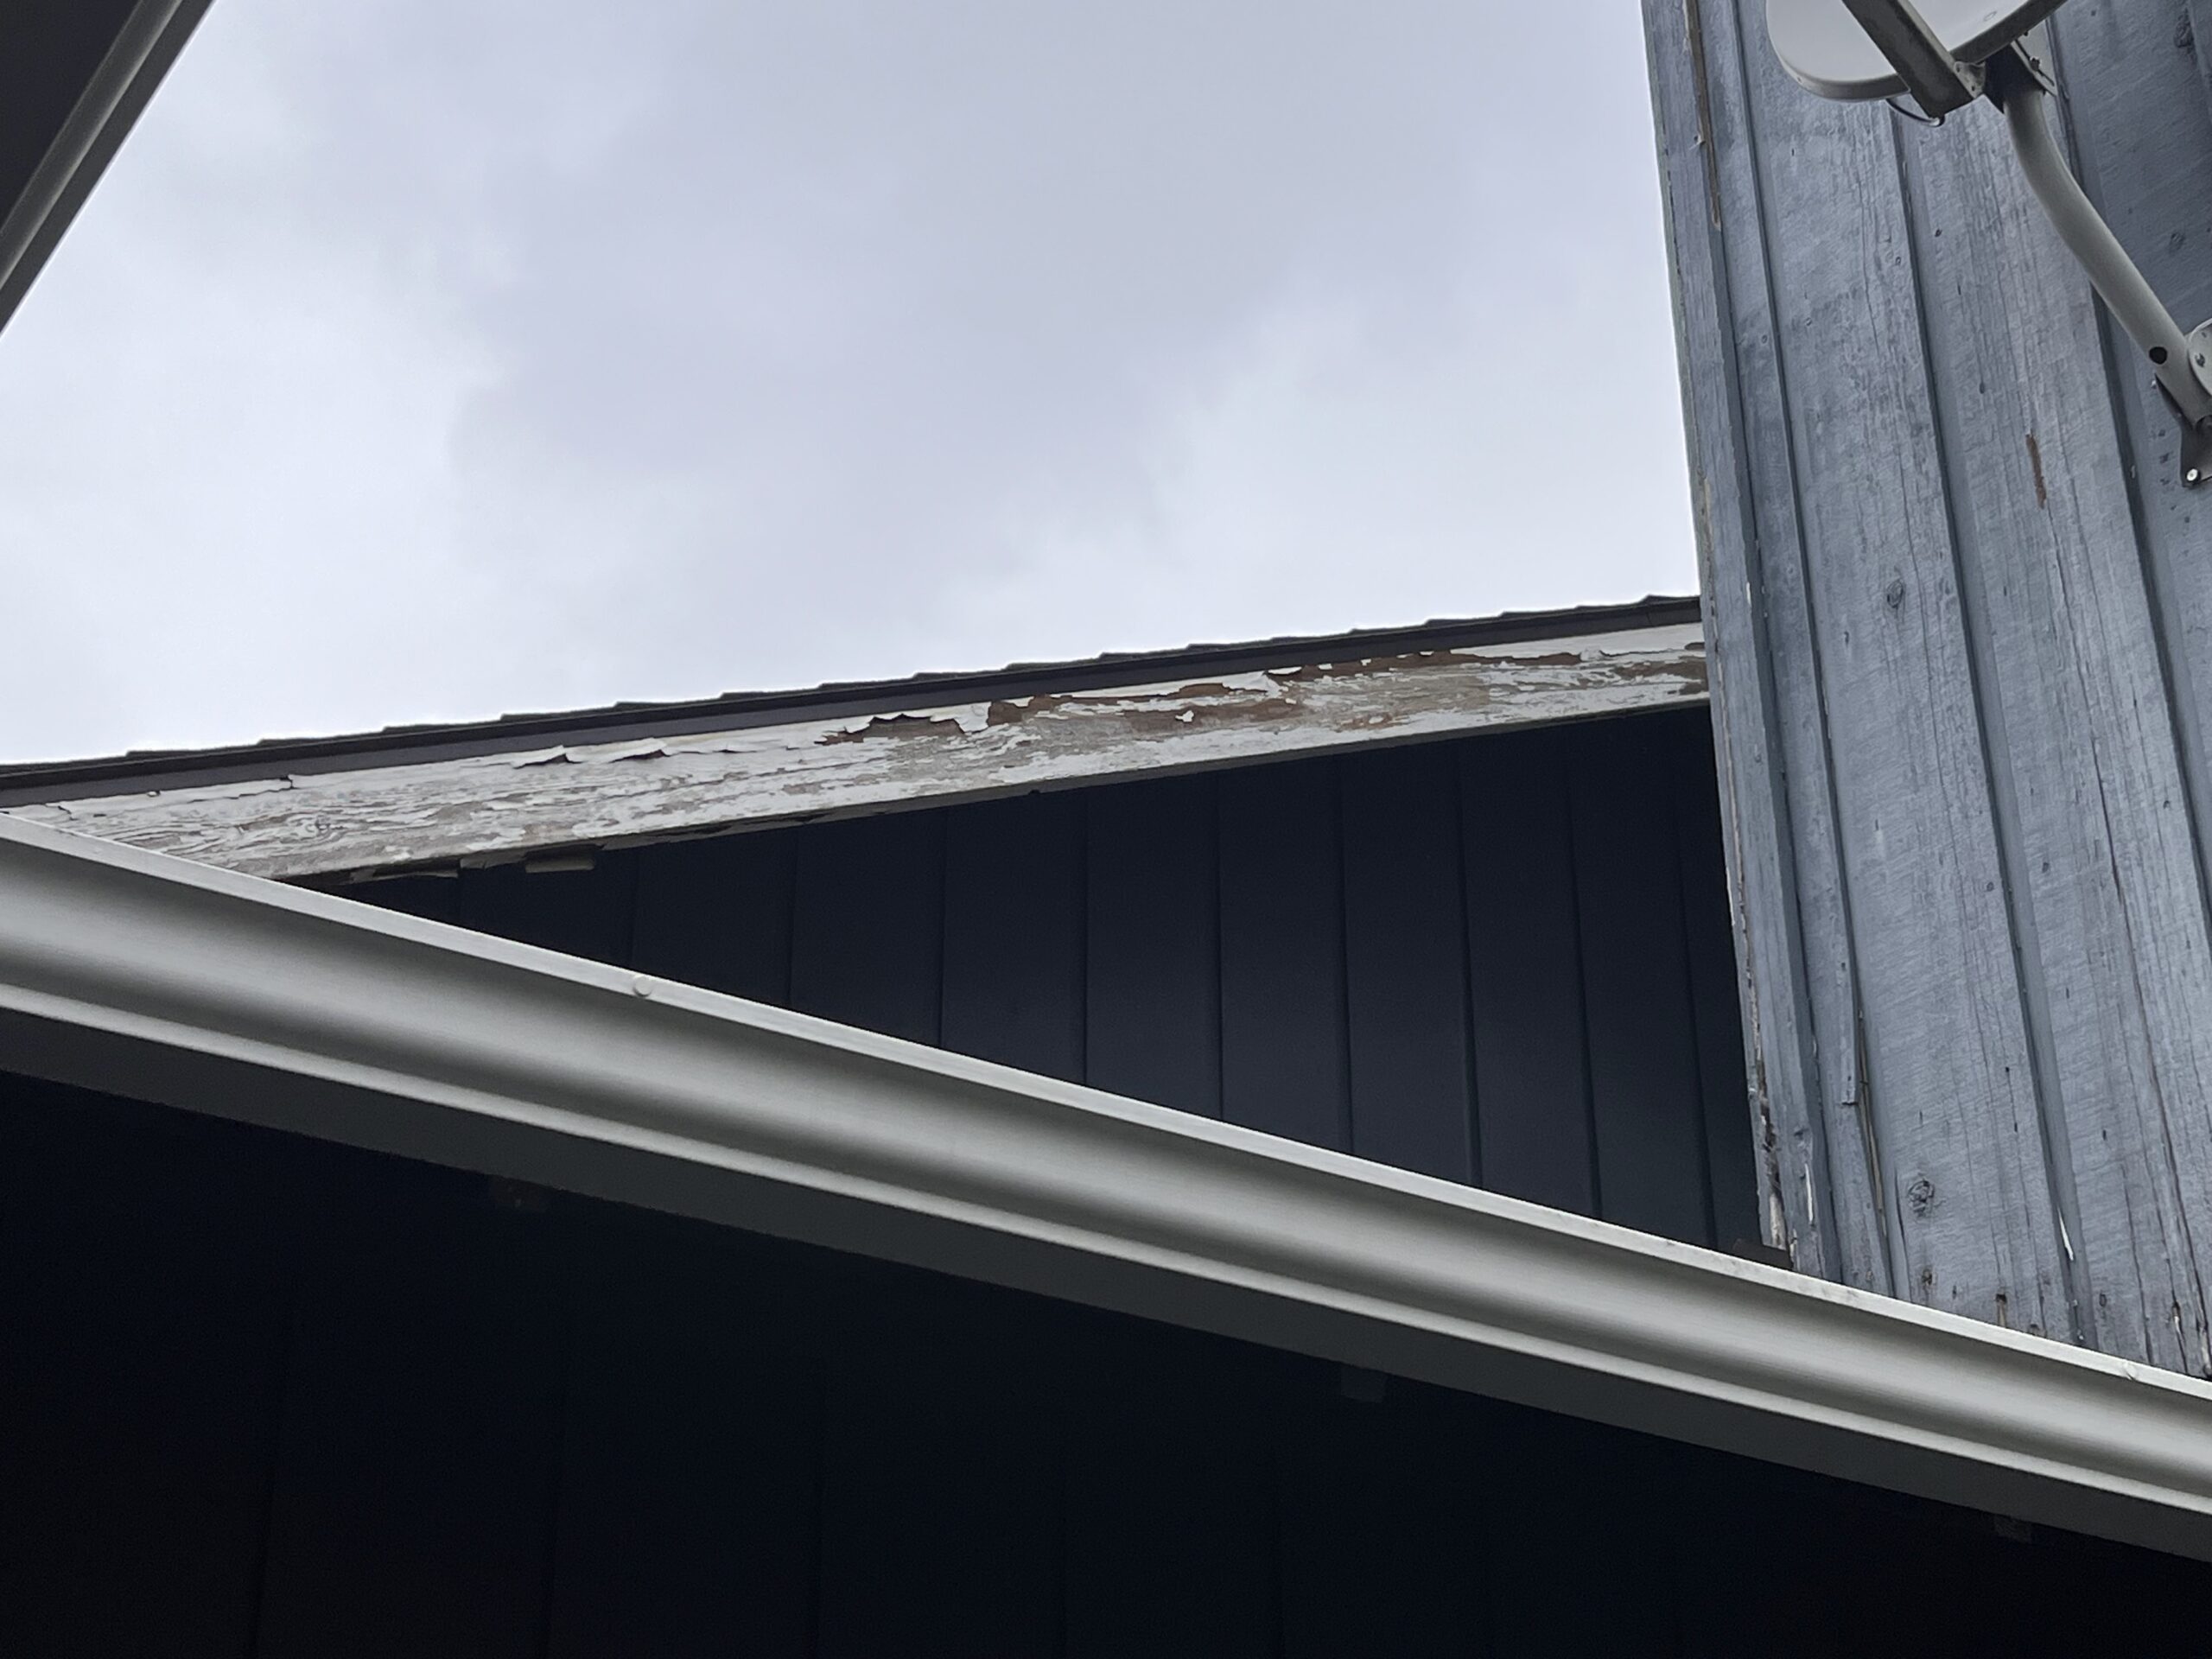
Addressing Rotten or Damaged Wood
Rotten wood is unfortunately common here in the damp Pacific Northwest. We’re always on the lookout for it when prepping a home for painting. Unlike some painters who might just paint over it, we handle these repairs internally and for larger repair projects we partner with top contractors to address rot head-on.
Depending on the extent of the damage, we’ll either recommend:
Replacing boards entirely – This is often the case for severely rotted trim or fascia.
Using epoxy repair systems – For smaller areas, remove the damaged wood, treat the area, and rebuild it using professional-grade epoxy fillers that harden and hold.
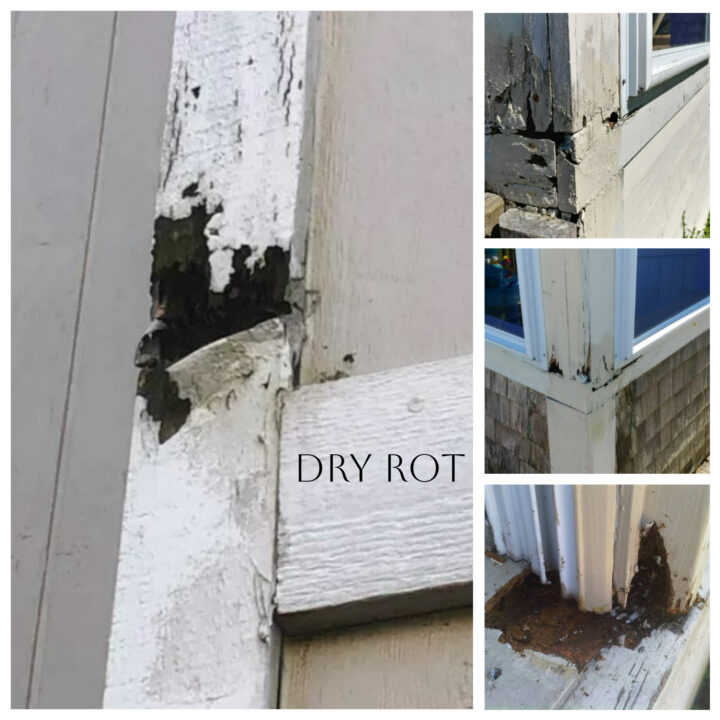
Painting over rotted wood is a recipe for disaster. It won’t hold paint, it spreads, and you’ll end up needing to repaint again sooner than you’d like. We don’t take shortcuts here, it’s just not how we do things.
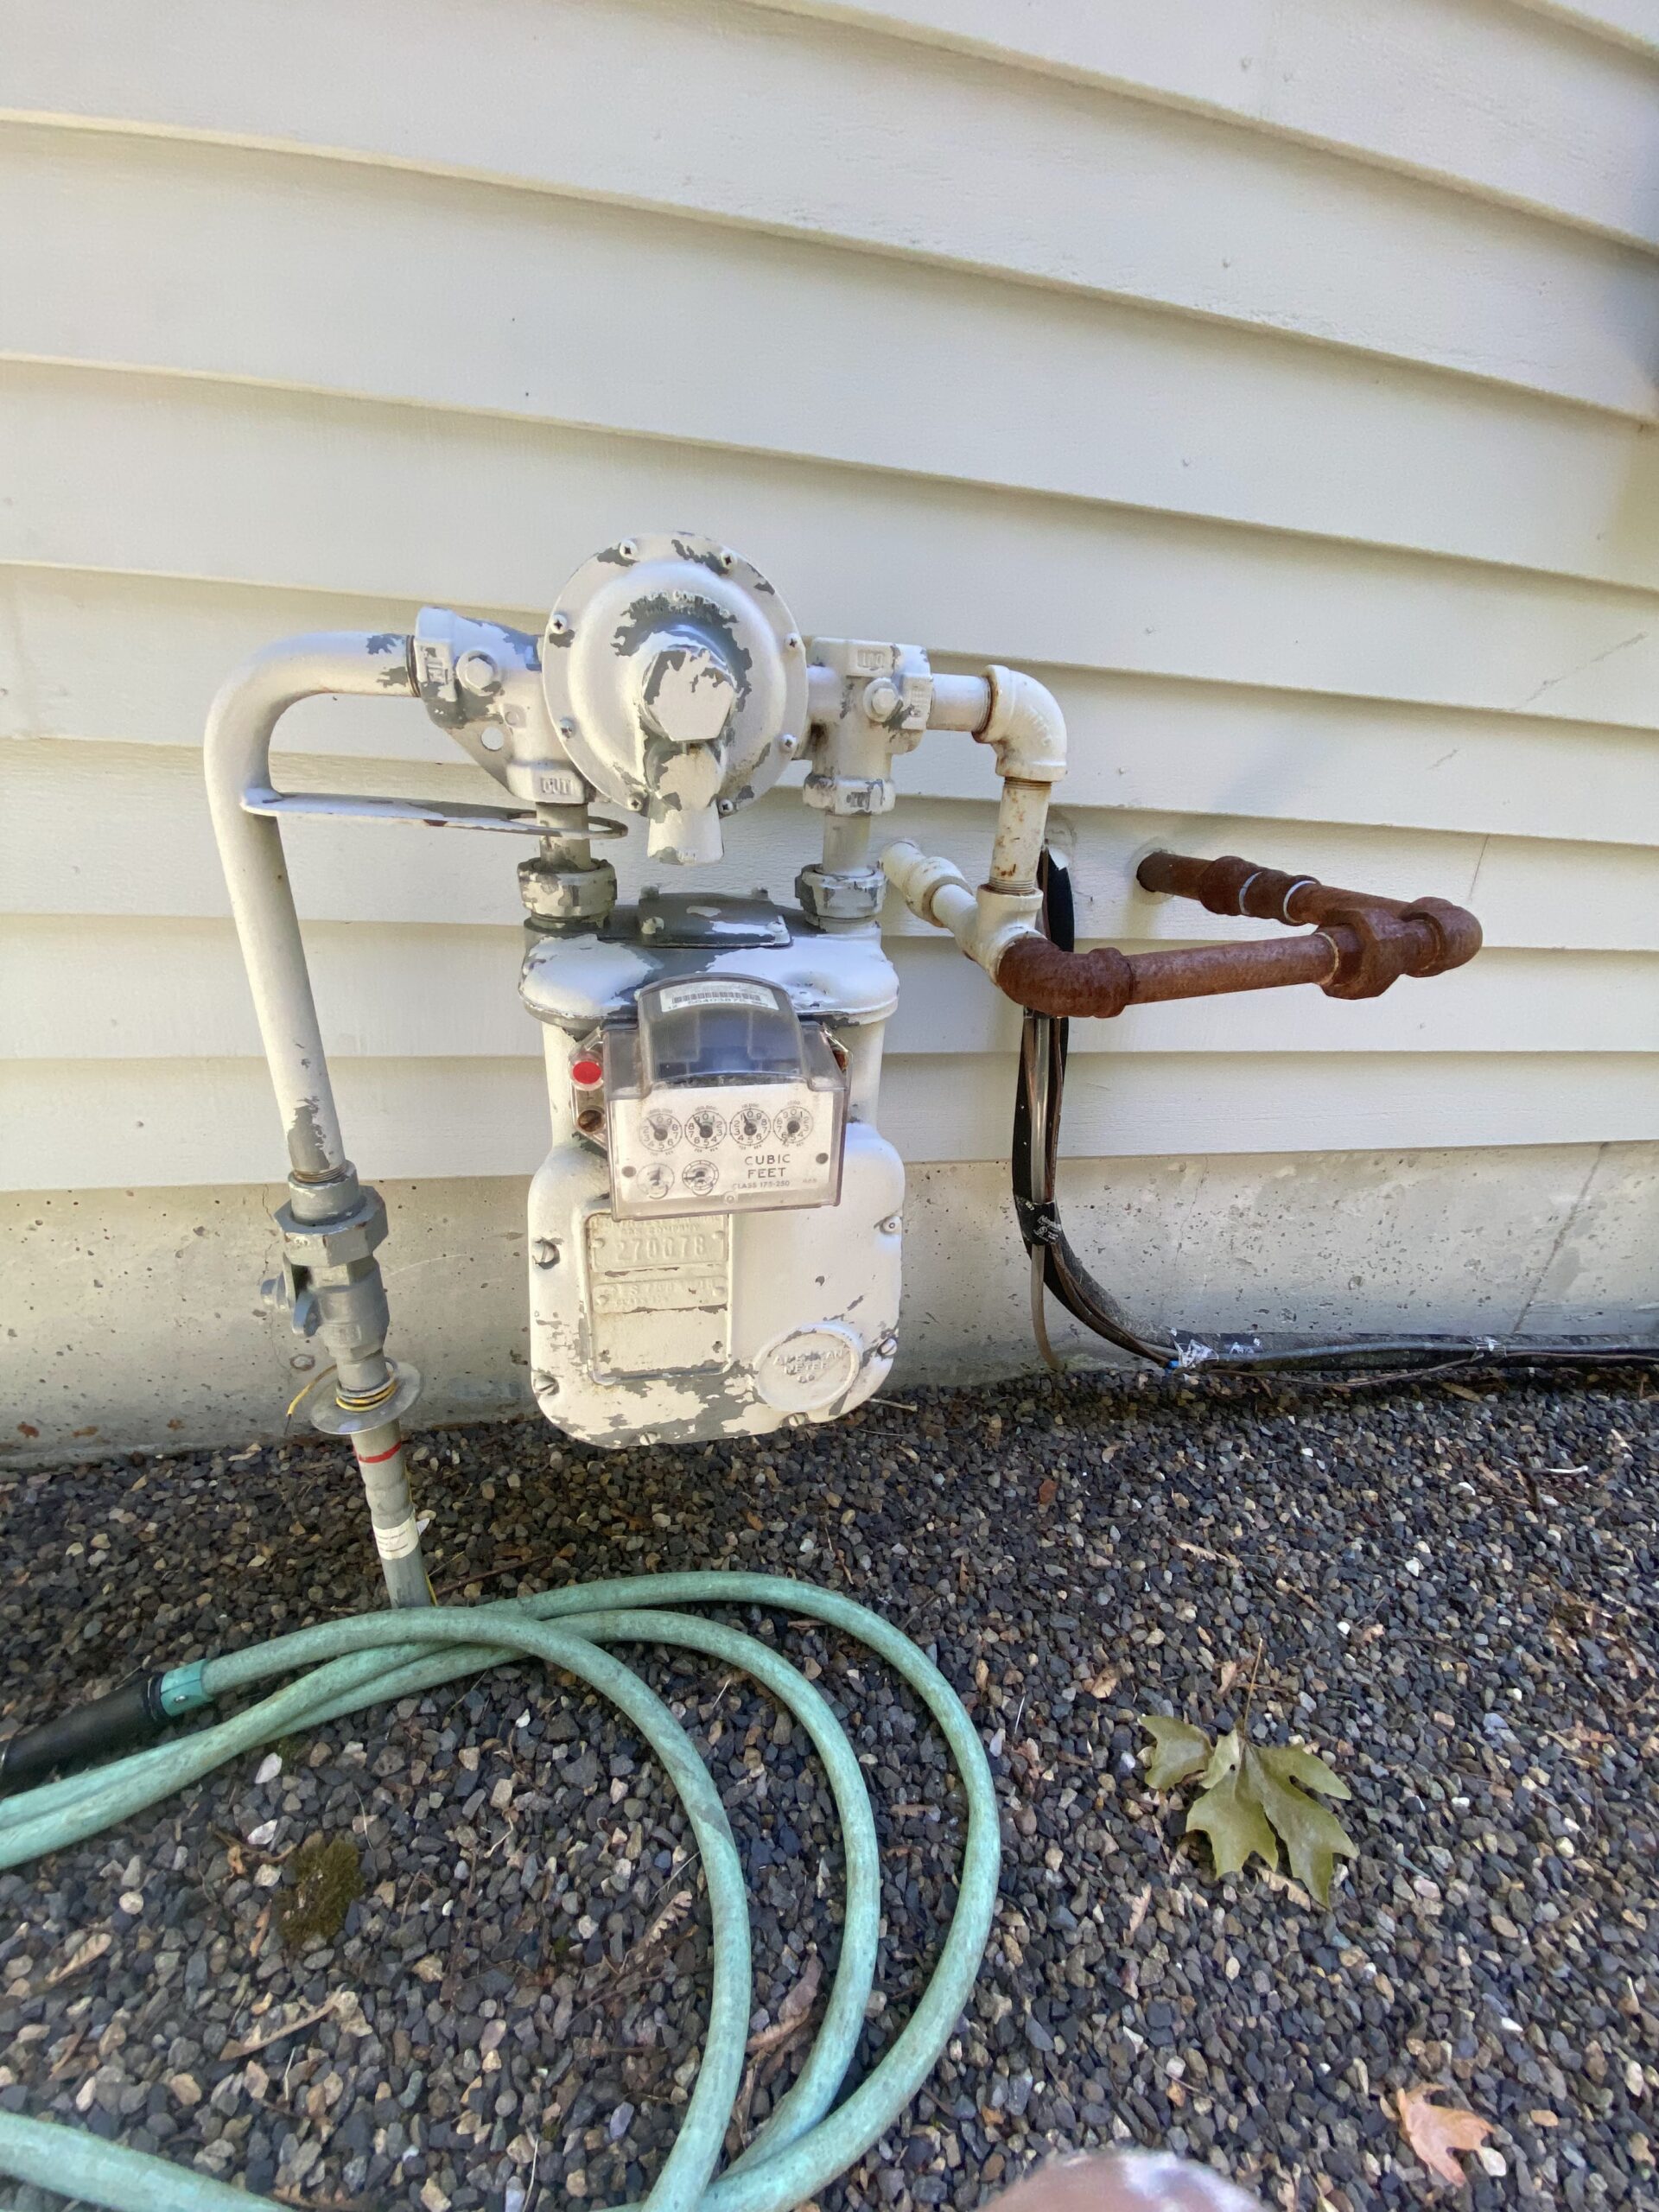
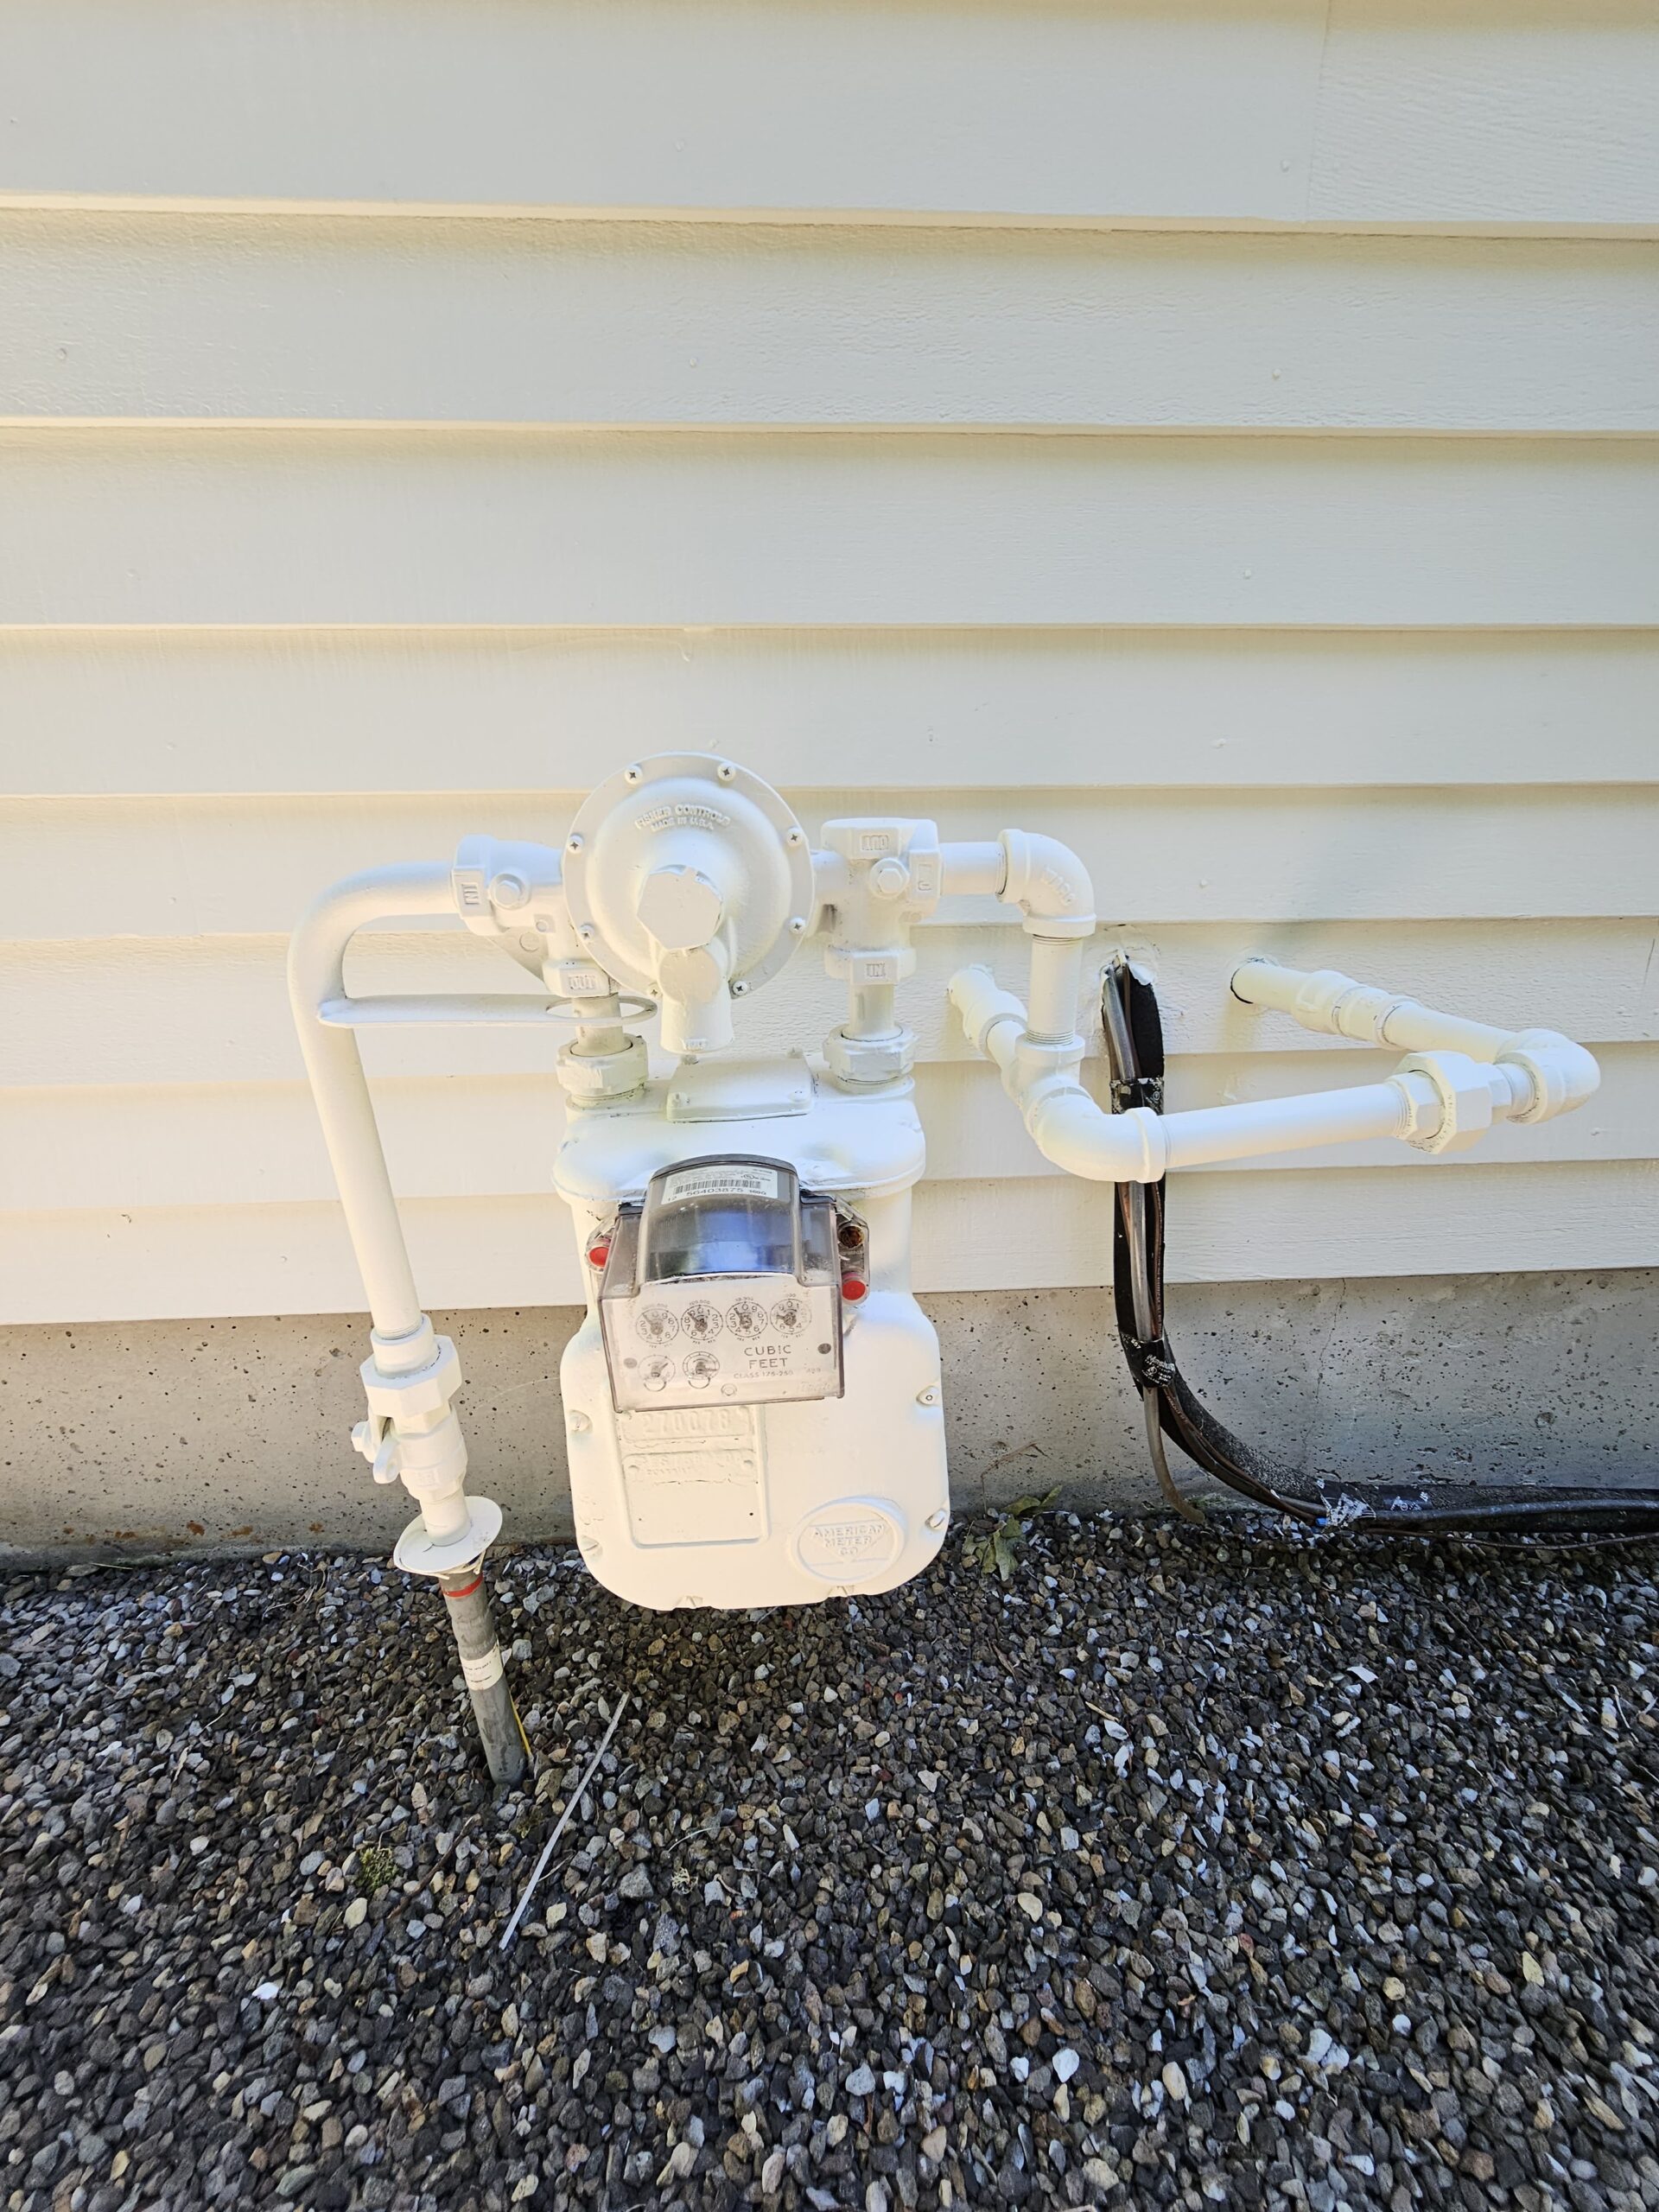
Rust Prevention for Pipes & Fixtures
We also pay attention to the little details like those rusty gas pipes, electrical conduits, and metal fixtures that might be attached to your home’s exterior.
Here’s what we do:
Remove flaking rust with wire brushes or sanders
Prime the area with a rust-converter / inhibitive primer
Topcoat with durable exterior paint matched to your siding or trim
If you don’t stop rust in its tracks, it will eat through metal and bleed through fresh paint. A little extra effort here saves major headaches later.
Why All This Prep Matters
We say it all the time: 80% of a great paint job is in the prep. When we take the time to properly caulk, repair, and prime your home’s exterior, we’re not just making it look good. We’re giving it a layer of protection that works with your paint to resist moisture, decay, and weather damage.
Cutting corners in this phase is how you end up with peeling paint, hidden rot, and paint jobs that fail years before they should.
When you hire Pearl Painters, you’re getting more than painters. You’re getting a team that cares deeply about doing the job right from start to finish. Caulking, repairs, and rust prevention are all part of our standard process, and they’re a big reason our exterior paint jobs last longer and look better.
Thinking about an exterior paint project this season? Let’s chat.
Do it right the first time

One Response
We needed to replace boards recently, and it was definitely a hassle. The results are worth it, though.